 4.8 ★★★★★ Excellence since 2016
 Home > GST > Help Center > Barcode Scanner UsageLast Updated: Sep 23rd 2022
SMEs who are in retail, trading, warehousing often need to bill / invoice using UPC based products that requires to use barcode scanner to read the product for accurate billing. EZTax.in made efforts in integrating barcode scanners with ease, this document explains steps, usage, compatible devices
If you are a 1st time entrepreneur, the chances are this is the 1st time you are getting to know ... 'A barcode scanner (aka barcode reader) is an electronic device that can read and output printed barcodes to a computer'. While there are many types of such scanners based on the technology and usage, these days, handheld scanner type is a most popular type used across SMEs. Mobile camera-based software scanners are growing in popularity for in-frequent / low-usage use cases.
UPC-A encodes 11 digits of numeric (0 to 9) message data along with a trailing check digit, for a total of 12 digits of bar code data

Its easier than generation of barcode labels, you can complete this integration in 3 easy steps
That's it. Start scanning while you are Billing / Invoicing
Go to Product Master shortcut Alt+P and update products with the serial numbers. You may skip this step if you have already updated this info. Alternatively, you may upload excel spreadsheet, but is recommended only if it is the first-time setup. The Serial Numbers could be any number you are using as Code to print as barcode label, but generally this is a 12-digit number, EZTax.in supports up to 16 characters (including number and alpha numeric)

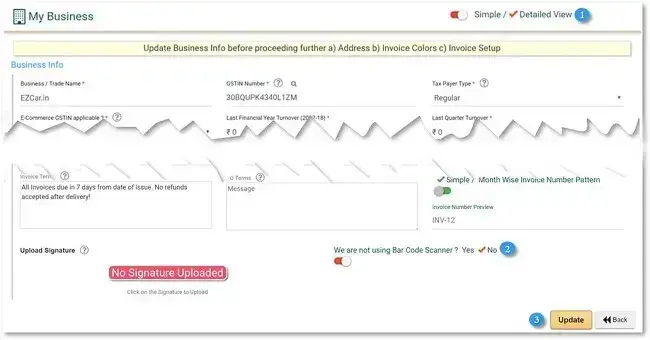
To enable Barcode Scanner Option, visit 'My Business' Screen by going to last menu at top-right corner, Click 'Edit' button for the business you would like to set this setting, once you see the popup with business details, select 'detailed view' to expand the screen and go to the end of the page to see the option 'We are not using barcode scanner?' Select 'No' and 'Update' the information.

Plugging your Barcode reader / scanner to your PC or device is entirely depends on the device and manufacturer, for most it should be plugging into a USB and test it. To test it, just open a notepad on your computer, and scan the label to see a number or information.
Once the scanner read the barcode successfully, you may visit Create Invoice Screen and select the customer to go to products part of the screen. Place the cursor in Product/Service column and scan the label to get it read.
EZTax.in not only reads the UPC / Serial Number information (you may hear a sound from scanner device), it will auto populate all the product information in to the invoice line as well. It also prompts with a audible bell to provide a feedback that it has selected the product. This was designed in such a way you no need to look at the system when reading multiple products with in an Invoice / Bill.
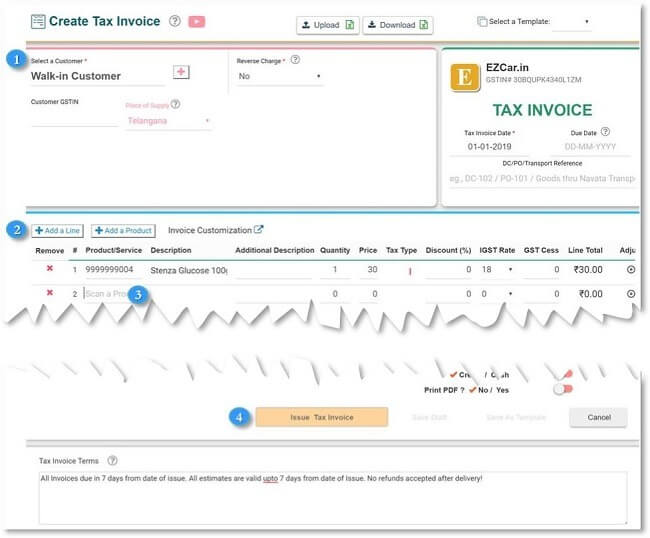
Press Alt+I to visit 'Create Invoice' Screen and Start creating the invoice. See below image and options explained.

Select the customer: Select the customer to whom you are preparing/issuing the invoice.
Add a Line: If you want to add the multiple products in the invoice, Click on Add a Line or just hit 'Enter' in the last row to create a new row. To Delete a row, click delete X icon for the corresponding row or hit Shift+Delete key.
Product/Service: In this field you have to scan the required product, the product should be added in the product master, if the product is not available in product master you can simply click on Add a product to add the product details.
If you are unable to scan the product, you can manually enter the product name/serial number.
Similarly, you can add any no of products with required quantity (you can increase the quantity of the product at any point of time before issuing the invoice).
Issue the Tax Invoice: Click on this button to issue the tax invoice. Based on the setup, the issued invoice will be auto-delivered to the buyer if an email-id exists in the customer master. If not, you may go to Invoice Summary screen to manually deliver the invoice.
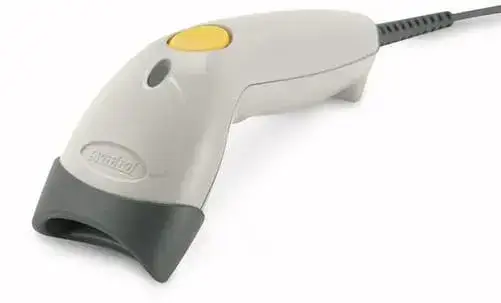
The Software was tested with Motorola LS1203 barcode scanner in Windows OS PCs, Chrome Notebooks etc. the scanner is a bi-directional that can handle 1D bar codes. In case if you have specific requirement, contact Team EZTax.in to get help.

Disclaimer: This article provides an overview and general guidance, not exhaustive for brevity. Please refer Income Tax Act, GST Act, Companies Act and other tax compliance acts, Rules, and Notifications for details.